How to reset a MacBook Pro

Last Updated on March 24, 2024 by Darron Dennis
For so many reasons you might want to reset your MacBook Pro laptop. Some of which includes when your MacBook Pro is very slow or you want to sell it.
Resetting a MacBook Pro simply means restoring your MacBook Pro to its default settings. Or how it worked when you took it out of the box.
Before letting go of your laptop or any other data storing device, take safety precautions like backing up your data.
In this guide, we’ll show how to unlink your MacBook Pro from your Apple ID. Also how to back up your data, and remove all personal info from your system. You’ll also gain knowledge on how to reinstall the macOS that originally came with your MacBook Pro. And definitely how to reset a MacBook Pro
So if you’re ready like am ready let’s get started on how to reset a MacBook Pro.
Table of Contents
Unlink your Apple ID
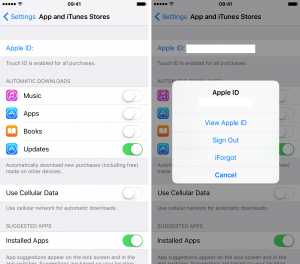
An Apple ID is an identity given to every Apple user. With this ID, u can access your files stored on icloud from any internet enabled device by imputing your correct details. If your ID falls into the wrong hands, your personal information might be at risk. So if you want to give your MacBook Pro away, you’ll need to unlink it from your Apple ID, otherwise, the new owner may have trouble signing in via iCloud. The fastest way to do this is to boot up your MacBook Pro, open System Preferences > iCloud and choose to ‘Sign Out’. You can safely choose to erase local copies iCloud data on your Mac, as they’re backed up to Apple’s servers.
Another way to remove the Apple ID is from any web browser. Visit the iCloud website and sign in with your Apple ID. Select ‘Find my iPhone’. Your MacBook Pro will be listed under ‘All Devices ‘.
Select your MacBook Pro and click ‘Remove from Account’. Make sure to do these steps for each person who’s signed into your MacBook with their Apple ID.
Back up your data
Before resetting your MacBook Pro to its default setting, ensure you backup all your personal data like documents, photos, and videos that you want to keep.
If you keep backups by methods for Time Machine, insert your picked drive into your MacBook Pro, click the Time Machine image at the top of your screen and pick ‘Back up Now’.
If you haven’t backed up your MacBook Pro before, its better you do it now. To start using Time Machine first find a blank external hard drive with a capacity at least equal to that of your MacBook Pro e.g. 500GB or higher.
Connect the drive to your device. The Mac Operating System will ask if you wish to use this drive for backup purposes. Click (yes) to confirm and the backup process will start automatically. This can take several hours. You can buy drives specifically formatted for macOS on the Apple online store but any external hard drive will do, as Time Machine will automatically format it to be Mac Compatible.
This process erases any data already on the external drive, so make sure to use a new or blank one.
Erase your hard drive
Once you are done backing up your files, safely disconnect your drive by opening Finder, then click the eject symbol next to the drive name.
Keep the backup drive in a safe place and then shut down your MacBook Pro. Once your device is fully shut down, make sure the power adapter is connected then hold down the keys Cmd + Alt + R before restarting your MacBook Pro.

If all goes well you’ll see the words ‘Starting Internet Recovery’ on your screen along with the image of a spinning globe. Release the keys and wait for Internet Recovery to finish loading. If you don’t see a small progress bar on the screen, click the name of your wireless network and enter your password. This allows your MacBook Pro to download the tools it needs to perform this task.
When the Recovery Area has been stacked, click ‘Disk Utility’ at that point ‘Proceed’. Your MacBook Pro’s hard drive will be shown in the white box on the left-hand side – its default name is ‘Mac HD’.
Click to feature this drive in blue, at that point pick the ‘Delete’ button. Double click that the ‘Configuration’ is set to macOS Extended (Journaled), at that point click the ‘Erase’ catch.
Reinstall macOS
Once your hard drive has been fully erased, the next step to take is to reinstall the MacOS. To do this, click the words ‘Disk Utility’ at the top left-hand corner of the screen, then choose ‘Quit’. This will take you back to the main page of the Internet Recovery area.
click the Wi-Fi image at the upper right of the screen and ensure there’s a dark tick alongside the name of your own wireless system. If not, click the system name to connect.
When you’ve done this, click the second alternative in the center of the screen marked ‘Reinstall macOS’ or ‘Reinstall OS X’, at that point click proceed. This will start the reinstall wizard. Note that this will usually be the operating system which originally came with your MacBook Pro, not necessarily the most recent version of macOS.
This is on the grounds that you’re utilizing the Internet Recovery Tools. If you utilize the standard Mac Recovery zone to reinstall macOS, the working link will be connected to your Apple ID, which means your secret key would be required for each product update.
The Internet Recovery instruments don’t require this, which is helpful in case you’re giving your MacBook Pro to another person. If they need the most recent rendition of macOS, tell them to sign in to the App Store and download it utilizing their own Apple ID, once reinstall is finished.
click ‘Proceed’ to continue, at that point ‘Agree’ to the Terms and Conditions. The introduce wizard will currently request that you pick the primary drive. click the one you deleted in the past advance (for example ‘Mac HD’ )and then install’.
Reinstall time will differ depending upon your internet speed. Keep your MacBook Pro connected with a power supply with the cover open while this is occurring.
Using Setup Assistant
After successfully reinstalled the MacOS, your MacBook Pro will launch Setup Assistant. This is the install wizard you went through when you first purchased your device.
At this point, the new owner of the laptop can then enter their details. That is if you If planed selling or giving it away.
In the event that you reset your MacBook Pro to fix an issue, like, a slow system, click ‘Next’ to acknowledge the default language. Setup Assistant will next offer you the opportunity to interface with WiFi – click the name of your system, at that point enter your WiFi secret word.
The Assistant will at that point inquire as to whether you need to move data to this MacBook Pro. This ‘relocation’ highlight is exceptionally helpful for individuals who purchase new gadgets and need to move information over from an old Mac.
If you use it here, nonetheless, it might likewise reestablish the product issue that made you reset your MacBook Pro in any case!
Pick ‘Don’t move’ for the present and furthermore ‘Don’t sign in’ whenever requested to enter your Apple ID and secret word. Setup Assistant will currently request that you enter your ‘Full Name’ and ‘ password’ to make an Administrator account on your MacBook Pro.
Enter the name ‘Test’ and password ‘test12345’ to be taken to the macOS work area. At this stage, you might be approached to sign in with your Apple ID. By and by, pick ‘Don’t sign in’ for the present.
In the event that you recently had an issue with macOS like Mail not opening, attempt to re-make it currently to check whether the issue still happens. In the event that it does, all things considered, the issue is equipment related. Visit Apple’s site to discover your closest Apple Store or approved fix outlet so you can have your MacBook Pro inspected.
How long does it take to reinstall Mac OS?
How do I fix an app not responding on my Mac?
- On your Mac’s keyboard, hit the Option, Command and Escape keys simultaneously (alt + ? + Esc).
- The Force Quit dialog box appears with a list of running programs.
- Select the frozen app and then click Force Quit.
- The software will stop running and you’re free to re-launch it at this point.