How to screenshot on Windows 10 PC

Last Updated on March 24, 2024 by Darron Dennis
Taking a screenshot with your phone is easy, but have you tried taking a screenshot with your PC? well if you haven’t, here’s an opportunity to learn how to screenshot on windows 10 PC.
There’re several methods to screenshot on windows 10 PC, however, we’ll be taking you through the most common and easy methods. Taking a screenshot is important and can be useful in the event that you want to show someone your current screen activity or in situations when you are having issues with your system and you want to relay it to a technician who isn’t close to where you are.
So, if you are ready to start screenshotting on your windows 10 PC, let’s get you started.
Table of Contents
Identify Your Print Screen Key
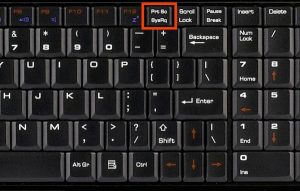
Your keyboard ought to have a Print Screen button, however, it might be written in shorthand, as “PrtSc”. It might likewise be the optional capacity of a key, so you may need to utilize the “Fn” key of your keyboard to utilize it.
When you’ve distinguished your Print Screen key and whether you have to press the “Fn” key to utilize it, you’re set to go.
How to Capture Your Whole Screen

In the event that you simply need to screen capture everything occurring on your screen so you can impart it to somebody, the procedure is staggeringly clear. You can likewise utilize an altered procedure to catch only your dynamic window.
- Step one: Press the Print Screen key. (Interchange: To catch only your dynamic window, press Alt + Print Screen.)
This will quickly take a screen capture of your entire showcase (counting any all-inclusive work areas you have), or your dynamic window in the event that you follow the substitute procedure. The screen capture is added to your clipboard, enabling you to paste it somewhere else.
- Step two: Paste the caught screen capture where you need it.
You can paste it into a picture supervisor, similar to Paint 3D, to edit and store it. Or then again, you can impart it to a friend or associate by pasting the picture into a talk or email.
It’s as simple as that you simply need an approach to rapidly share what’s on your screen. Nonetheless, there are further developed approaches to screen catch on the PC.
How to Capture Your Whole Screen Directly to a File
The above procedure is convenient for irregular screen captures, however on the off chance that you have to catch a progression of screen captures rapidly, we have a superior procedure.
Duplicating to the clipboard implies you have to paste the screen capture elsewhere before taking another screen capture. On the off chance that you don’t glue it someplace, the first screen capture will be overwritten constantly.
Along these lines, rather, you can utilize this technique to rapidly take a screen capture and have Windows in a split second save it as a PNG picture document.
- Step one: Simply press the Windows Key + Print Screen. (Interchange: add the Alt key to the key blend to store a fast screen capture of just your dynamic window.)

It’s as simple as that. When you’ve played out that progression, Windows will store the document. Naturally, it ought to show up in your This PC > Pictures > Screenshots folder document way.
When you play out a screengrab of the dynamic window, it may not go to this folder, be that as it may. For our situation, we saw the pictures go-to This PC > Video > Captures document way. Windows should exhibit pop up when utilizing this elective method, so you’ll have the option to see where your screen capture is spared.
How to Capture Portions of Your Screen

On the off chance that you’d preferably be somewhat more exact with your screen captures, Windows 10 has a few apparatuses that can support you. The first is the Snipping Tool, however, Microsoft is anticipating supplanting it with the Snip and Sketch application, which plays out a similar role. We’ll concentrate on the last mentioned, as it will have the most utility once the switch is made.
- Step one: run the Snip and Sketch application.
You can essentially type “Clip and Sketch” into the Windows 10 search bar to discover the application and open it.
- Stage two: In the upper left of Snip and Sketch, press the “New” button.
This will obscure your screen and give a couple of choices at the highest point of the screen. In the event that you need to take a deferred screen capture, you can tap on the down bolt beside the “New” button.
- Stage three: Click and drag to draw a box around the area of the screen you need to catch. (Alternatively: you can likewise draw a freestyle catch space by choosing the Freeform choice from the buttons at the highest point of the catch screen.)
Similarly, as with the first screenshotting strategy we went over, this technique catches the screen capture and adds it to your clipboard. Cut and Sketch will likewise promptly show your new screen capture inside the application, letting you rapidly alter it and save it as a document.
In the event that you’d like to take an additional quick screen capture with Snip and Sketch, some later forms of Windows 10 (Creators Update and later) utilize the keyboard shortcut Shift + Windows Key + S to bounce directly into catch mode.
How Would You Screenshot on a Windows 10 Phone?
So as to take a screenshot on Windows Phone 8.1 and Windows 10 Mobile, go to the screen or application that you need to catch in the screen capture. At that point, press and hold the Power and Volume Up button simultaneously. If done correctly, you’ll notice a capture sound and likewise, get a notification.
How Would I Take a Screenshot Without PrintScreen Button?
Press the “Windows” key to show the Start screen, type “on-screen keyboard” and after that click “On-Screen Keyboard” in the outcomes rundown to dispatch the utility. Press the “PrtScn” button to catch the screen and store the picture in the clipboard. paste the picture into a picture proofreader by pressing “Ctrl-V” and after that save it.
Where Are Screenshots Stored?
To save screenshots to a folder, there are two or three directions that saves the screen captures straightforwardly into a picture document (e.g., pressing Windows + PrtScn on the keyboard). When you do this, the documents are spared in the Screenshots folder found in your Pictures library.